Prerequisites
- Docker 19.03.6+
- Docker Compose 1.28.0+
- 4 CPU Cores
- 8 GB RAM
- 20 GB Free Disk Space
Installing Sentry
First step you need to do is clone the repository from github. Cloning it will allow you to pull updates at a later stage. Before running the command make sure you cd into the directory you would like the sentry to be installed.
git clone [email protected]:getsentry/self-hosted.git sentryFeel free to name the repository whatever you want. Then cd to it and run the command below to start the installation process.
./install.shDuring the installation you will be asked to create an admin user for sentry. When the installation finishes you will see a message asking you to run the command below. Proceed with running to start the sentry containers.
docker-compose up -dCongrats! Your Sentry installation is now accessible through http://{your_server_ip}:9000
Configure Sentry
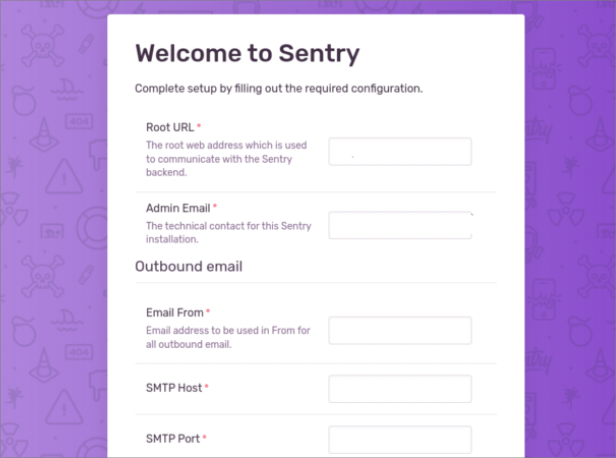
The first time you login, you will need to fill in a few fields. The important field here is the root url which is the domain name you would like sentry to be accessible through. Could be sentry.{your_domain}.com or the ip you already accessed sentry. Make sure you setup your DNS for that subdomain.
Create SMTP Credentials for AWS SES
https://docs.aws.amazon.com/ses/latest/dg/smtp-credentials.html
If you would like Sentry to send emails at certain occasions like when a new issue is created, you will need to setup the SMTP Settings. To that you can use any of the many mail providers out there, such as AWS SES, MailerLite, MailerSend, Mailgun, SendGrid, etc.
For this example we will setup AWS SES.
To create your SMTP credentials
- Login to the AWS Management Console and go to the Amazon SES console at https://console.aws.amazon.com/ses/.
- Choose SMTP settings in the left navigation
- Choose Create SMTP Credentials in the upper-right corner – the IAM console will open.
- For Create User for SMTP, type a name for your SMTP user in the IAM User Name field and choose Create in the bottom-right corner.
- Expand Show User SMTP Security Credentials – your SMTP credentials are shown on the screen.
- Download these credentials by choosing Download Credentials or copy them and store them in a safe place, because you can’t view or save your credentials after you close this dialog box.
Important Note to myself 👉👈
Your SMTP user name and password are not the same as your AWS access key ID and secret access key. Do not attempt to use your AWS credentials to authenticate yourself against the SMTP endpoint. For more information about credentials, see Using Credentials With Amazon SES.
You should now have the SMTP credentials to paste in the setup page. As soon as you submit the installation page form, your sentry installation is ready to be used.
If you passed that page you can make the necessary changes by editing the file “sentry/config.yml” inside your sentry installation.
mail.backend: 'smtp'
mail.host: 'email-smtp.eu-central-1.amazonaws.com'
mail.port: 587
mail.username: 'AK###################'
mail.password: '################################'
mail.use-tls: true
mail.from: 'entry <[email protected]>'
Setup Reverse Nginx Proxy
Start by creating a new site-enabled file which will hold the necessary server and location information for the reverse proxy.
sudo nano /etc/nginx/sites-available/sentry.server.comPaste the below code block into that file. Make sure to update the paths and domain of your server installation.
server {
    listen 80;
    listen [::]:80;
    server_name sentry.server.com;
    root /home/ubuntu/sentry.server.com;

    index index.html index.htm index.php;

    charset utf-8;

    location / {
        proxy_pass http://localhost:9000;
    }
}
As soon as you run the command below to restart nginx and your dns is properly setup, you should be seeing your sentry app, when you access the subdomain you setup.
sudo systemctl restart nginx
I found it too hard to get Sentry up & running as a self-hosted instance, so I wrote my own alternative instead: Bugsink. Shameless plug, I know, but it might be useful either for you, or for your audience.
Self-hosted Sentry requires quite a bit of system resources, so I created Telebugs as a lightweight alternative. It takes less than 5 minutes to set up with a single command. It’s fully compatible with Sentry SDKs, and works as a seamless drop-in replacement.